Pages

Saturday, 3 October 2015

Autumn smoky eyes♡

Autumn has arrived, 'tis the season for electric blankets, mugs of hot chocolate and most importantly Autumn makeup! It's time to crack out your orange and warm toned browns and home in on smoky eyes, with nude lips or nude eyes and dark lips! 

I love to mix and match my colours, no two smoky eyes of mine will be exactly the same, but a really elegant smoky eye is one of my favourites. You don't need a face of makeup for a smoky eye either, just a spot or two of concealer and a lipstick could do you for a whole day, paired with a little powder to control your pores. I love this palette which is Frontcover's winter box palette thing, because it has a variety of warm and cool toned colours. 


Along with this I take my MUA bronzer which I've shown on here before probably about a year ago. I use this bronzer as an eyeshadow and even though you may be thinking why the hell would you use bronzer as eyeshadow, it really works for me as it is a warm orangey tone, bringing out the hazel in my eyes. 

I also take a little bit of a copper shadow from revolutions iconic 2 palette, just to sweep across the finished look to add a little sparkle, I also run this along my waterline to brighten up the eye.

I also use Makeup academies fine line eyeliner, I've tried a few eyeliners, like no7 and collection and they've all been a bit rubbish and at the same time I would not spend over £20 on one from benefit, so when I found MUAs fine liner I instantly fell in love. It not only has great staying power, it's also really easy to apply and also wipes away with ease, so your not madly wiping away at your eye, pulling out all of your eyelashes at the same time. The other thing too is that I have really sensitive skin and so a thick product can really irritate my skin, however this product really works and does not leave my skin feeling anything less than normal:)


To recreate this look you could use similar products or just swap out products for ones of your own, tailoring the style to you. 

First of all I took iron stone from the front cover box palette which is a greeny toned brown and swiped this all over the lid.
 I did this lightly because I wanted a more orangey toned brown on my eye but you could really go to town with this shade and make the look a lot more greeny! 

After blending iron stone a little just to soften the shadow I took the darkest brown in the iconic two palette and lightly traced my crease, rocking the brush back and forth to provide a transition colour for our actual prominent shadow to blend to. 

Then taking the Mua bronzer in shade 2 I applied this generously to my whole lid, slightly dampening the brush to make the colour stand out even further. Blend this in and blend it into the darker brown shade in the crease so that you do not have blocks of colour but a nice gradient. 

Taking the same dark brown shade I added a little black eyeshadow and focused a lot of drama to the outer corner of my eye again sweeping this through my crease. For a more dramatic look you could take the further and further toward the tear duct, depending on how prominent you want your eyes to be. 

I then took a setting brush (random I know) and lightly added the copper colour to the eye, just delicately to make the eye sparkle. This added a little shimmer and sort of completed the look. This stage is optional, you could stay for a very matte bold eye or make it a little more shimmery with a touch of glitter, whatever you like it's totally up to you. 

I then added a thin line of eyeliner really close to my lashes and then a really thin line from just below my bottom lash line line, following the eye until the two lines meet. I then created a flick by drawing from the bottom line up and increasing the thickness to an amount I was happy with. 

I then took the copper shimmery colour that I used on my eye and packed this very delicately onto my waterline with a Barry m eyeshadow brush. This really helps to open up the eye and to make the eye stand out a lot more. 

And finally to round it all off I applied lots of mascara to add another dramatic element to the look. You can add as little or as much mascara as you like, making sure none goes onto your smoky eyes;)

I then proceeded to fill in my brows, highlight my brow bone, add a bit of concealer and a nude lip, finishing a really fun, creative and simple makeup look that is really effective and can be tailored to suite most occasions, and can be done with many different gradients of colours! 

Thank you for reading,
Make sure you've subscribed if you would like to be updated on when I post and add my Instagram and snap chat for updates too. Leave a comment if you like too, on any suggestions or questions etc. 

See you soon,
Bye;) 


Thursday, 1 October 2015

Baking ~ chocolate brownie cookies:P

Heyyyyy,

So I made chocolate brownie cookies and they were delicious; I just had to share them with you! This is Tanya Burr's cookie receipe but I just took different amounts of chocolate and played around with it to create these wonderful brownie like cookies. These are perfect as a big chunky cookie for pudding or as a little treat. I also made one without all the chocolate inside and the cookie mixture without the chocolate is divine, although it tastes better with chocolate if I'm honest. Tanya states that it makes around 10 cookies, I made 13, it just depends on how big you make the cookies.

What I used:
*300g of caster sugar
*200g of butter, softened (I used baking spread, but butter would work too)
*75g of cocoa powder, sifted
*275g self-raising flour, sifted
*1 large egg
*1 cup of white chocolate pieces (quite big chunks)
*1/4 a cup of milk chocolate pieces (quite big chunks)
*1/2 a cup of dark chocolate pieces (cut up quite small so that they incorporated better)
*1-2 tablespoons of milk (depending on ho easy your mixture is to stir.
*remember you can put in whatever chocolate you like and the amounts are up to you really*


I also used a hand whisk, but as you add the flour it kinda get clogged up inbetween the whisks and it gradually gets harder and harder to work, this is where you can use a wooden spoon or your hands.

Method:
1. After preheating your oven to 200 degrees celcius / I used gas mark 6, you want to grease and line 2-3 large baking sheets. Set these aside.
2.You then want to take your bowl and add in your softened butter. Then with a wooden spoon I just beat this for around 1 minute, just so that it is smoother and is not in big clumps. Then I pour              around a third of the flour at a time, beating thoroughly between each increase in sugar. By the second lot of sugar I usually start using my hand whisk. You want the butter and sugar to be a pale yellow!

3. Then you want to crack the egg into another small bowl, or a jug, and beat it lightly. Then add it to the main mixture. Beat this in lightly.
4. Then you can add in the cocoa powder and flour, again adding in small increments just so that you don't get a cloud of flour when you turn the whisk on. (As I explained before, this is when you may want to use your hands to incorporate the ingredients)
5. At this point you can add a tablespoon of milk if the mixture is looking dry, it has look like a dough so don't overdo it with the milk, it mightn't even be necessary.
6. Now you can add the chocolate.
It is best if you use your hands to make sure the chocolate is evenly spread throughout the dough so you get at least a piece of each in each bite. Keeping the           chunks big means that you can bite into a lovely gooey mess but the chocolate has not melted into the actual dough.
7. Then you want to take a small handful of the dough and mold it into a ball (it should be 1 and a half times the size of a golf ball-ish) and spread these out quite far apart on the baking sheet, making sure you have chocolate in each ball. Try not to manhandle the cookie dough a lot as it does become greasy on your hands.
You will get little bits of chocolate peaking out and that's good!
8. Then pop them into the oven. Now I know that in the oven I use it takes exactly eleven minutes but I'd leave them for no longer than 15. The cookies shouldn't feel hard when you take them out the oven, if they are then they wont be crunchy outside and soft in the middle, they'll be more like a biscuit. The cookies should be soft to the touch, and have spread out quite a lot. You then need to leave them out on a work surface to cool; the outside will become crunchy! You can eat them slightly warm or cold and they keep for 2-3 days. Do not refrigerate as they do go soft in the fridge.

This picture does not do these cookies justice but we couldn't wait to eat them. When warm the chocolate inside is melted yet still has a structure to it (once you've baked these you'll know what I mean). They were quite big, but not too big. And you got a hint of the dark chocolate but it wasn't really bitter, it was a good combination. 

Well thank you for reading,
My posts are more regular now on a Thursday at 10pm England time♡ see you next week;)


DIY desk storage:)

Hellö again,

This is a different sort of post for me today, but I've been tidying up my whole room for the last week and I decided to make some DIY to put on my desk/inside my cupboard on the school shelf. They are one of the easiest things to make and the "preparation time" is really up to how quick you do cover the pen pots.

List of things you need:
- a range of plastic/glass tubes (a pringles tube, kitchen roll tube, gravy pots etc.) I advise you to use plastic because it won't break as easily or won't get damaged if it gets wet.
- a range of coloured paper/wallpaper/wrapping paper
- pva glue/sellotape
- paintbrush
- newspaper (optional if you don't want mess then it would be beneficial)
- water
- stanley knife/sharp scissors/a really sharp knife
- a sharpie


The Pringles Tube.. (dun dun duuuun)
So for a pringles tube pen/stationery pot you will probably want to cut it into two, or you could cut it into more but I cut it into two. You will want to do this because or else you will have to reach in to grab your smaller pencils and pens and it can be really annoying having to tip them all out just to find hat really old grubby pencil that is now shorter than the length of your little finger but it's your favourite pencil and you just want to use that one. No, just me, oh okay then:(

What you'll then want to do is take your halves and find the end with the lid. All I did was tape the lid to the tube so it was secure, therefore it is not going to have a hole in the bottom and let all the pens fall out. Once you have the bottom taped up, flip it so that it is on it side. Then measure the amount of paper you will need to use for your pen pots; leave space for overhand so you can fold it in to the pot, giving it a more secure hold. Cut around the length and then cover your pot, outside and the top sections of the inside. You then need to take your papers and cover the Pringles tube. Any overhang may be easier to stick with sellotape as it is a funny angle. It is probably better to leave this to dry overnight but at least 3 hours for the glue to dry. And there you can make two cute easy pen pots to fit lots of pens, makeup brushes or just little necessities you want them to hold.
You can then just repeat the steps above with different tubes that are all shapes and sizes. 

Thanks for reading,
See you soon, goodbye :)


Tuesday, 29 September 2015

New Instagram and snapchat;)

Hey, 

This post is just a little bit of a filler, to say I have made a new snapchat and Instagram for this blog. 

The snapchat is bblogically

The Instagram is beautyblogically


Add it if you want updates! 

See you soon,

Bye:)

Thursday, 24 September 2015

Back to school desk organisation:)

Hello again,

Long time eh?

As you will know, back to school came around for most of us around 3 weeks ago (give or take a week depending on where you live). And with back to school comes new folders, planners, notebooks, pens, pencils and all of the other little necessities ready for a new year. 

Now I've never been one for a tidy desk area but at the start of this academic year I told myself that I wanted to start being way more organised and keeping things a lot neater and tidier. So far, so good (touches wood). 

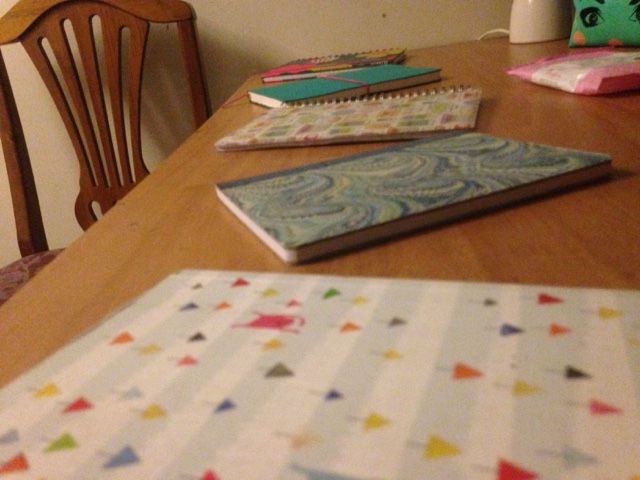
From this picture you may think "oh well that's quite obviously staged and it wouldn't be that neat!" And that is where you my friend, are correct. No it's not this neat all the time and in order to take the photos I did move my Latin books and I did place 5 of my many notebook in a neat way but that's for the purposes of the blog (I know in my ♡ how tidy it was). This area also doubles up as where I do my makeup and hair in the morning, hence the facial wipes and hairbrush.

My lamp. I love this lamp, but I'm afraid I can't give you a shop or a brand because I bought the lamp from a charity shop, it cost £1:D I then got a new lampshade and just changed it from the dull, ancient white one to this pink and white polka dot one. I feel like having a dark wall behind my desk has its pros and its cons but with the lamp it just brightens up the whole area and makes it feel a little more inviting.


The little quotes are actually postcards from paperchase, and I just find them really cute and motivational, brightening up the real wall. I actually am going to buy a lot more of these so that I can have the whole wall being motivational.

My mirror is also one of my favourite things about the desk. It tilts so you can adjust the angle of it and position it to suit you. It is from Ikea and it is the Myken (I don't have a clue what this means but that's what it says on the label). Again a mirror is an essential for doing makeup and hair, I also have another mirror hung up on my wall that is bigger.

I then have the Zoella makeup bag, full of all my beauty bits and bobs. I might do a what's in my makeup bag post soon, so keep an eye out:)


The little pen pots are actually a DIY and they are so easy to make. I've filled this one with fineliners and ballpoints. (Don't ask me why I have 4 light green pens because I don't know myself). Pens are an essential to any desk and the cuteness of the pot just makes the desk look even more satisfying to sit at, even if I am procrastinating half the time, rather than doing homework. Again I have a blog post about them going up soon so keep your eyes peeled;)


I love to keep lots of notebooks on my desk and have copious amounts of them lying around the house and a whole box full in my bedroom. The thing is I love notebooks but I never want to use them. Once I'm stuck into them, I can fill a notebook in a matter of weeks but ruining the first page is always the worst thing for me. The notebook closest was a gift from a friend nearly two years ago now but I love it a lot. Then there is a marble notebook that I'm pretty sure was out of a magazine a while back (this one I've yet to write in), Then it's a cute technology covered notebook that was from Tesco;s around 6 months ago. Then a plain teal blue one with a bright pink wrap around string to keep everything enclosed. And last but not least is a mustard and fuchsia floral patterned notebook (it looks more pleasing than it sounds). 

I could ramble all day about my love of notebooks but I' bore you with my passion.

Keep up to date by adding your email on the subscription list <------ read previous blog post to see how to do this! 

Thanks for reading, bye :) <3 


Sunday, 26 July 2015

Photo a day - week 1:)

Hellö,

So yes I know I just posted a mascara review and yes it's twenty past midnight so it's technically not Sunday but my auntie, sister and I are all doing a photo a day for summer and I'd like to share with you mine for the past 7 days:
This is Monday's photo, and no I didn't take it or draw it myself but one of my best friends drew it and I really like it! I think it's super creative and definitely couldn't draw it myself!

Day 2 is when I decided that I'd do a mascara review and so did an awful few shots of my mascara that I'm loving right now!

Wednesday is a picture of some cheats s'mores which me and Hannah made! They were very tasty and I will share with you the recipe and some more photos in a blog post coming very soon!

Day 4 is a picture of how I arranged my jewellery on my set of drawers in my room! I am going to do a jewellery collection so again keep your eyes out for that soon!

Day 5 is a bit of a weird one really but it's of my handwriting when I wrote checklist in my notebook! I just thought it looked really nice! I did actually have a really eventful day on Friday I just didn't take many photos really!

Day 6 is a picture of my hair that I curled, no my head isn't shaped dodgy I was wearing a flower crown and it's made the back of my head look weird! It's blurry because a 4-year old took the shot but I really like it!


And today was a picture (a rather bad one) of Latin vocab checklist number 19! I took this because I was copying up a lot of vocab into a vocab book for next year, and I don't know why I took it because I had the textbook in front of me, random;)

Okay so that was my week of pictures, I've got lots planned for next week so I'll see you then, bye!x

Ps - if you're reading on a pc then please enter your email on my homepage (I think it works*crosses fingers*) and get updated when I post or if you are on mobile scroll to the bottom of the homepage, click view web version (or something like that) and then add your email! If it doesn't work then leave a comment and I'll sort it out. It should appear here on your screen:
Do you like the new theme by the way? I prefer it to the old one. Goodnight x


Mascara review:)

Hellö,

So today I thought that I would blog again for the first time in what seems like forever! So my collection lengthening mascara (I may have shown it previously) ran out last week so whilst I was out shopping I came across the pink packaged version and I was like "..hmm okay well this looks interesting" and so I picked up one of each. 

I will always love the lengthening mascara as it makes my lashes super long and full, somehow without any clumps! It is super long lasting and is easily buildable! It is a great mascara for day-night where you can a apply a reasonable amount in the day to wear to school or work or just a general summer look and then when you're at an event, party or an evening event you can apply another coat (or two) to really open up your eyes and make your eyelashes POP! 

I love the wand to this mascara, however I'm a little unsure of how it's meant to be! You see, I always thought it was a straight wand, but mine seems to be curved! In the image above I tried to diminish the fact that it was curved because I'm pretty sure it's meant to be straight! The reason I think it's curved is because I have a real hard time getting the wand back into the tube! The main reason for this is probably because I used my used mascara to photograph and its old and dry! (That's why the photo of it looks incredibly grubby!)
So as I said previously, I also bought the volumising mascara, which claims to give 10x extra volume! I've used this mascara about 5 times now and it is amazing! The wand really grabs every single lash and with just even 1 stroke of the wand you are left with fuller lashes. The mascara doesn't give you length but it certainly gives volume so the two mascaras compatible together give you both long and full lashes! 
And just one thing that I love about both mascaras (and some people may find this weird) but when you open and close them, the slanted lid faces the right way and clicks into place. I don't know about anyone else but it's one of the most irritating things when lids of bottles or tubes or whatever don't lie straight with the product :} it's super annoying!

Anyway, I let you get back to your summer holiday/vacation or work and I'll hopefully blog again very soon!

Goodnight x